|
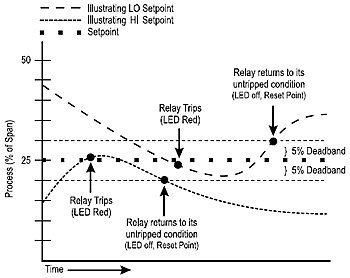
Figure
1: Limit alarm operation and
effect of deadband
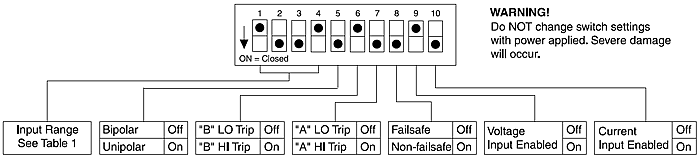
WARNING:
Do not change switch settings
with power applied. Severe damage
will result!
1.
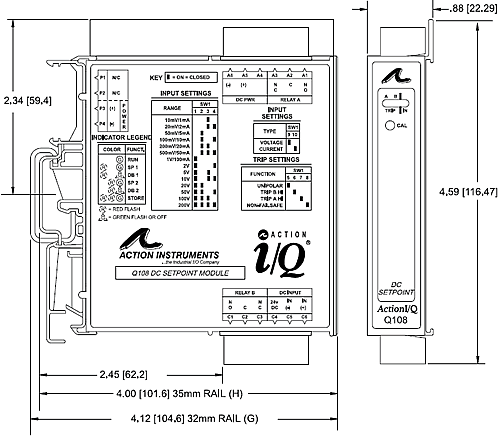
With the module removed from
the rail and not powered, snap
off the face plate by lifting
the right edge away from the
heat sink. Note the input switch
(SW1) is located under the faceplate.
Set positions 9 & 10 for
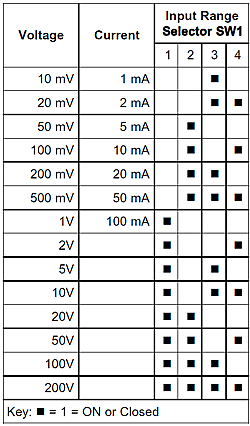
voltage or current input (see
Table 1).
2.
Set positions 1 through 4 of
"SW1" for the desired
input range (see Table 1).
3.
Set position 5 of "SW1"
to ON (closed) for unipolar
(e.g., zero based, 0-20mA) range
or OFF (open) for bipolar (e.g.,
-100% offset, -20 to 20mA) range
(see Figure 5).
4.
Set positions 6 and 7 "SW1"
to ON for a HI trip setpoint
or OFF for a LO trip setpoint
(see Figure 5).
5.
Set position 8 of "SW1"
to ON for non-failsafe operation
or OFF for failsafe operation
(e.g., alarm trips upon power
failure).
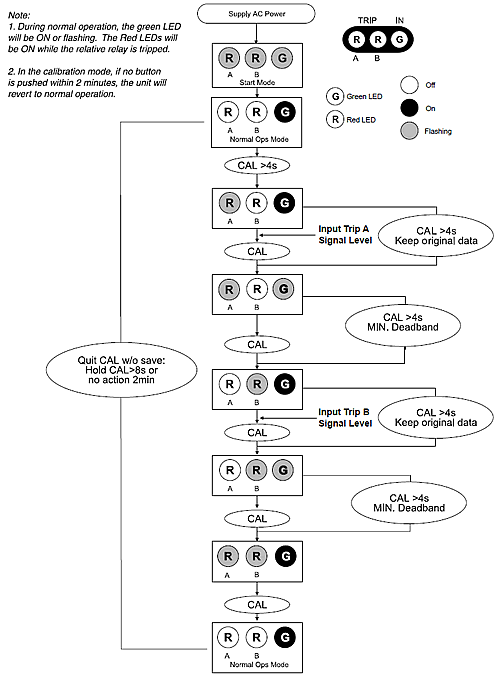
Calibration
1. After configuring the DIP
switches, connect the input
to a calibrated DC source and
apply power. Refer to the terminal
wiring in the specifications
section.
Note:
For best results, calibration
should be performed in the operating
environment, mounted on a DIN
rail, allowing at least one
hour for thermal equilibrium
of the system.
2.
After applying power to the
unit all three LEDs will flash
for approximately 10 seconds.
Adjust the input signal level
for the Relay "A"
setpoint. The green LED should
be on. Press and hold the CAL
button for 4 seconds (until
the red LED starts flashing)
to enter the calibration mode.
The green LED will be on and
the red Relay "A"
LED will be flashing.
Note:
If the green LED is flashing,
the input is out of range (i.e.
7% above or below the configured
range). Check to make sure the
input signal is within the DIP
switch configuration range.
Double check the DIP switch
settings.
3.
Setpoint "A": Input
the desired trip level for Relay
"A" and push the CAL
button. The green LED and the
red Relay "A" LED
will be flashing. Note that
the green LED will stop flashing
when the input drops below a
high setpoint or rises above
a low setpoint.
|
 |
4.
Deadband "A": For
minimum deadband (approximately
0.25%), press and hold the CAL
button for 4 seconds. For high
setpoints, lower the input level
to the desired deadband point
and push the CAL button. For
low setpoints, increase the
input level (green LED turns
off) to the desired deadband
level and push the CAL button.
The green LED will be on and
the red Relay "B"
LED will be flashing.
5.
Setpoint "B": Input
the desired trip level for Relay
"B" and push the CAL
button. The green and the red
Relay "B" LED will
be flashing. Note that the green
LED will stop flashing when
the input drops below a high
setpoint or rises above a low
setpoint.
6. Deadband "B": For
minimum deadband (approximately
0.25%), press and hold the CAL
button for 4 seconds. For high
setpoints, lower the input level
(green LED turns off) to the
desired deadband point and push
the CAL button. For low setpoints,
increase the input level to
the desired deadband level and
push the CAL button. The green
LED will be on and both the
red LEDs will be flashing.
7.
Press the CAL button once again
to exit the calibration mode.
Check the setpoint and deadband
to validate calibration.
Relay
Protection and EMI Suppression
When switching inductive loads,
maximum relay life and transient
EMI suppression is achieved
by using external protection
(see Figures 2 and 3). Place
all protection devices directly
across the load and minimize
lead lengths. For AC inductive
loads, place a properly rated
MOV across the load in parallel
with a series RC snubber. Use
a 0.01 to 0.1mF pulse film capacitor
(foil polypropylene recom- mended)
of sufficient voltage, and a
47 ohm, 1/2W carbon resistor.
For DC inductive loads, place
a diode across the load (PRV
> DC supply, 1N4006 recommended)
with (+) to cathode and (-)
to anode (the RC snubber is
an optional enhancement).
Table
1: Q108 Input Range Switch
|